Mini-Extruder Assembly Instructions
Before assembling the extruder for the first time, thoroughly clean all parts (except for the Polycarbonate Membranes and the Filter Supports) with a mild detergent solution, followed by rinsing with hot tap water and deionized or distilled water. Allow all parts to dry before assembling apparatus.
The original Mini-Extruder design contains flat washers, and a bearing washer, that are not stainless steel and will rust if not thoroughly dried. Rinse with methanol or acetone and dry immediately. The all-teflon Mini-Extruder design replaces these components with a teflon bearing. The teflon bearing is available as a replacement; part number 610019, Teflon washer for extruder.
How To Assemble The Mini Extruder
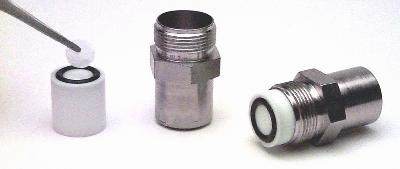
Refer to the diagram to identify the parts in these instructions.

1. Place the 2 Internal Membrane Supports on a flat surface with the O-rings facing up.

2. Pre-wet 2 Filter Supports with DI water, or buffer, and place over orifice. The Filter Supports should adhere to the teflon orifice inside the O-ring inner diameter.
3. Insert the Internal Membrane Support, with the Filter Support, into the Extruder Outer Casing with the O-ring facing up.
4. Place 1 Polycarbonate Membrane in the Extruder Outer Casing over the Filter Support and O-ring. The Polycarbonate Membrane is the thin, shiny disk – do not install one of the blue paper disks which separate the Polycarbonate Membranes.
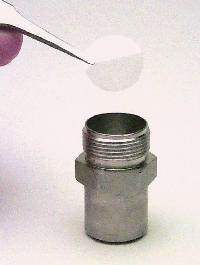
IMPORTANT NOTE: Polycarbonate Membranes and Filter Supports are intended to be used for a single liposome preparation and should not be reused.
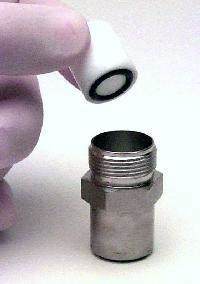
5. Pre-wet a second pair of Filter Supports with DI water, or buffer, and place over orifice of remaining Internal Membrane Support.
6. Carefully place the second Internal Membrane Support into the casing (O-ring facing down) being careful not to twist the Membrane Support when it comes in contact with the Membrane.
7. If you have the original Mini-Extruder design, place the flat washers on either side of the bearing washer and insert into the Retainer Nut. For the all-teflon Mini-Extruder, place the teflon bearing into the Retainer Nut.
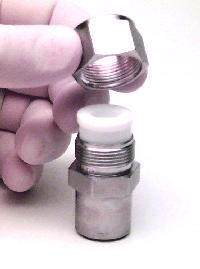
8. Place the Retainer Nut on the threaded end of the Extruder Outer Casing and tighten. Tighten the Retainer Nut by hand just until it is finger tight; do not use a wrench.
.jpg?la=en-gb&h=207&w=300&hash=729ABFB73EB620E629F17E6147766760)
IMPORTANT NOTE: Autoclaving the Teflon inserts is not recommended as slight distortion may occur (~0.002mm). The use of ethylene oxide or gamma irradiation is suggested as an alternative. The syringes should be sterilized with ethanol.
Warranty
Avanti guarantees the apparatus free of defects of workmanship for a period of thirty (30) days. If you experience any problems due to workmanship during this time, please contact us to arrange an immediate replacement or exchange of the defective component.